MotoTune:FAQ:How do I resolve identifier conflicts and use MotoHawk and/or MotoTune in a J1939 network?
When MotoTune is to be used in a J1939 CAN communication scheme, conflicts can arise. Since MotoTune and J1939 specs arose in different industries, they have their own, predefined CAN identifiers. Using these identifiers can cause conflicts and hamper successful use of MotoTune and MotoHawk within a J1939 network. Fortunately, the conflicts can be resolved, as described in the following sections.
Contents
The Identifier Conflict
SAE J1939 provides a list of reserved CAN addresses. Within a J1939 network these addresses should not be used by any device that is not performing the function outlined by the specification. As examples, the engine is 0x00, and an after treatment device is 0x3D.
It happens that using the MotoTune default city ID of 0x02 results in CAN identifiers that conflict with the SAE J1939 reserved address for a turbocharger controller. Also the MotoTron default controller identifier, PCM-1, uses a city ID of 0x0B, which conflicts with the SAE J1939 reserved addresses for a Brake System Controller.
The Conflict Resolution
The resolution is to remap the MotoTron protocols to a J1939-compatible ID pair. To do this, modify both the PC software, and the module-contained software. The two types of modifications necessary -- in Model-based (MotoHawk) software, and in the PC-based (MotoTune/MotoServer) software -- are described in separate sections below. Those using only the PC-based Tools would require only the PC (MotoTune/MotoServer) section.
MotoHawk Model Configuration
The first task is to make the application running on the module capable of engaging in MotoTune traffic, on any CAN ID pair.
Instructions
- In the MotoTune Protocol Definition block, check the "Define Transmit and Receive ID" checkbox and enter the value hex2dec('1800') for the Transmit and Receive ID Upper Words. These upper words will be combined with the city ID and the source address of an incoming MotoTune connection to make transmit and receive IDs for the MotoTune protocol.

- Set the CITY ID to the desired source address assigned to the module. For example, for an exhaust aftertreatment system use = 0x3D (61 decimal). The system will use a RxID of 0x18003Dtt and TxID of 0x1800tt3D. The byte 'tt' is the source address of the PC Tool and is typically configured to be 0xF9 as described in the MotoTune/MotoServer Setup that follows.
- Build the MotoHawk model with this block and settings and program the module. The module is now capable of communicating via a J1939-compatible ID pair.
Legacy instructions:
Use the MotoTune Handler block (available under Optional Downloads , Library CAN protocols) in the MotoHawk model, instead of using the default handler provided by the CAN Definition block:
- In the MotoHawk model, in the CAN Definition block parameters dialog, uncheck the “Install MotoTune Protocol” checkbox to disable the default handler.

- Add a “MotoTune Custom CAN Protocol” block to your model.
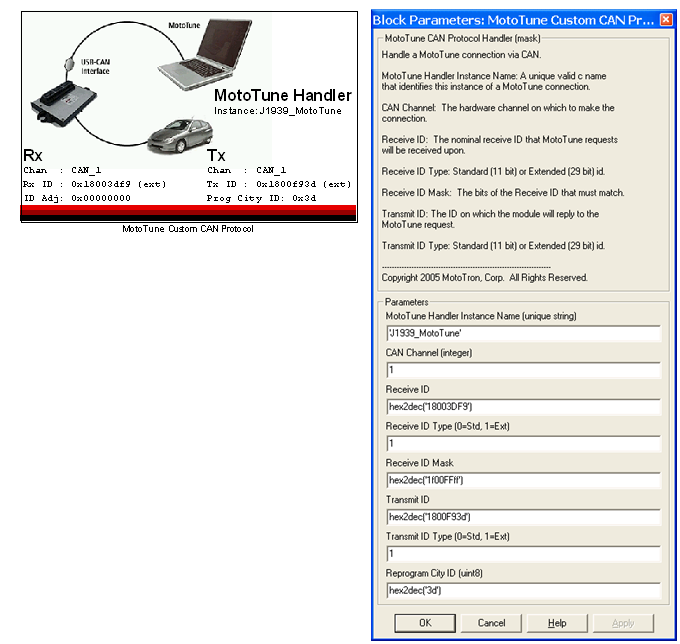
- Set the CAN IDs in this block in the form:
RxID: 0x1800mmTT
TxID: 0x1800TTmm
--where mm is the source address assigned to the module, and TT is the source address assigned to the PC tool. For example, for an exhaust aftertreatment system, mm = 0x3D (61 decimal) and TT = 0xF9 (249 decimal). - Build the MotoHawk model with this block and settings and program the module. The module is now capable of communicating via a J1939-compatible ID pair.


MotoTune/MotoServer Settings
With the module enabled for the new CAN IDs, next set up MotoTune/MotoServer accordingly. To set a custom CAN ID for MotoServer:
- Right-click on the "satellite dish" icon in the lower-right corner of the computer screen
- Select Ports...
- Select Edit Names.
- Select Add.
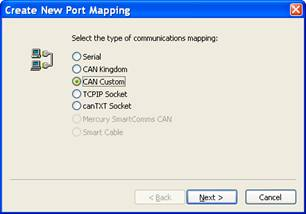
- In the Create New Port Mapping dialog, select CAN Custom and then click Next.
- Enter an appropriate port name and enter the IDs (in decimal) corresponding to the module IDs.
----------------------- Hex -------- Decimal ---
TxID to Module 18003DF9 402669049
RxID to Module 1800F93D 402716989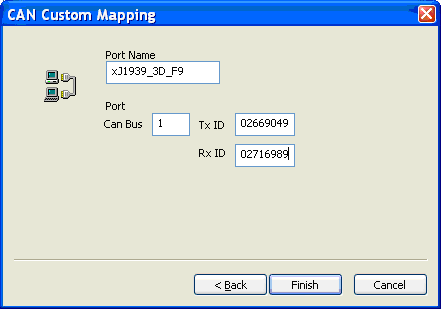
- Click on Finish, then at the prompts, OK, and Add.
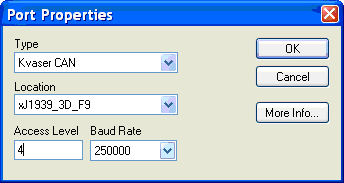
- On the Port Properties dialog, select Kvaser CAN for Type, then for Location, select the port name that you just created. Also make sure to set appropriate Access Level and Baud Rate. Click on OK.


The new port is now enabled for MotoTune. Your port is now listed by name and checked on the Port Configuration dialog. 
If this process is set up correctly, you will see indications that MotoTune communicates to the module via the J1939: 

[[1]]